Tuesday, December 28, 2010

Brewing Lagers

I had the perfect plan to brew beer today when my van broke down again. Apparently there is something called an engine coolant temperature sensor and it decided to stop functioning as I was driving home from my storage unit with a fermentor containing a nice Whitelabs WLP840 lager yeast cake in the bottom.


Rice Rice Baby!

Now that the weather has turned cool here in Northern California, (high 40's to low 50's over night) I decided it would be a good time to get a series of lagers brewed and stashed away to condition for a few months, beers that would be ready for the spring. The idea was to brew three back to back batches, racking the fresh wort onto the yeast cake of the previously fermented batch.

I decided to begin with a standard American lager to be followed by a Munich Dunkel and finally a Doppel Bock. Yesterday I kegged the completed American lager which attenuated to 75%. It was fermented with a yeast starter that I had stepped up a couple of times. I also milled the grain for the Munich Dunkel and measured out the hops for the brew session today. I was in transit with the fermenter full of yeast when the van died on me. Now, at the end of the day I got the van back and the fermenter is sitting in my beer closest downstairs, the new plan is to brew tomorrow.

For those interested in the recipe for the American Lager I'll include it here. Note that I used instant rice, in this case Minute Rice, as an adjunct for the beer. Most homebrewers use rice syrup or flaked rice in light lagers to raise the gravity without adding color or flavor to the beer. Minute rice will provide the same qualities and amount of sugar but is cheaper and convenient. Just mix in the whole grain in your mash with the rest of the grist. I figured a 1.032 gravity per pound per gallon with this instant rice. Note that using regular rice requires pre-cooking prior to adding to the mash.
Anyway, here's my recipe:

Standard American Lager
For 11 gallons of wort going into the fermenter
efficiency of 90%
attenuation 74%
abv 4.75%
srm 5
ibu's 12
o.g. 1.044
f.g. 1.011

12 lbs 2-row
.5 lbs Munich
2.75 lbs Minute Rice (18%)

Mash for 60 minutes in 4 gallons h2o at 155f.
Sparge with 11 gallons h2o at 180f. (I used 6 gals. of this as R.O. water, my water here is pretty hard)

Boil 75 minutes

Add 1.75 oz. Saphir hops (aa 3.5%) for last 60 mins. of boil
Add   .75 oz. Saphir hops (aa 3.5%) for last 15 mins. of boil along with some Irish moss

Chill to 54f. and pitch yeast starter WLP840
Ferment until complete (in this case at 52f. it took 11 days)
Rack to kegs, carbonate to 2.8v and set aside to lager at 50f. for three months.

Tuesday, December 21, 2010

Arend Tripel Review

Beer Diary...

I sat down with a glass of Arend Tripel with the intention of forcing myself to review the beer when it occurred to me that a thousand other people have already reviewed this beer (and every other beer for that matter) with similar thoughts as mine, and I just stopped and decided to give this revelation some serious consideration. At this moment, I don't really care what I have to say about Arend Tripel, I mean, it's a good beer that fits the description of a classic Belgian tripel but saying anything beyond that simple point is, well, pointless. Ratebeer and Beeradvocate have ton's of reviews with details and applied averages and all kinds of ratings to enlighten those interested. The logical step for me would to simply place a link to those sites from here and here leading to a cluster flock of opinions about this beer. Then I could follow up those links by saying something like - "what they said".


As you can tell, I'm feeling pretty uninspired at this moment. Maybe it's the holiday season or because today is the shortest day of the year. It could be the recent rains and continuous overcast skies weighing down on me like an iron lid, but I just don't have much enthusiasm for writing. Even when I speak, the words come out like rusty water from a roof gutter, monosyllables dropping one at a time and forming a large pool of nonsense on the sidewalk that people have to step around. It feels like I've said all there is to say about beer and I hear my inner voice, "it's time to move on for Christ's sake". Still, I'm hoping that this is a temporary phase brought on by the Winter gloom. The interesting thing is, and when I say interesting I mean annoying, is that while I'm at a loss for words I keep getting RSS feeds from bloggers who seem relentless in their task of filling the blogosphere with beer talk. They just keep coming up with more to say about the subject.

You hear how cynical I am. It's got to be the month of x-mas, it's taking me down a very negative path. Thank the baby Jesus that there are beers like Belgian tripels to buoy my sinking heart. Did Arend Tripel buoy my sinking heart? Kind of, but it didn't help me wax poetic about beer. I don't blame the beer for not lifting my spirits, I only had one of them and that was only an 11oz. bottle. Wait a minute, is that the lesson here? I think it is. So, hold on while I refill my glass.

Monday, December 13, 2010

Brown Ale With Joanna's Almond Toffee

Personal friend and excellent candy maker Joanna always brings in a large batch of her chocolate covered almond toffee to the Thanksgiving gathering each year and I can't get enough of this delicious dessert. This naturally led to the idea of combining her toffee with a classic brown ale and so I proposed brewing a batch of beer and incorporating the toffee into the recipe. Joanna agreed to make a special batch of the candy, modifying her recipe slightly by eliminating the butter that she uses because I thought that the butter might negatively effect the head and head retention on the finished beer. We also agreed to leave off the chocolate coating for the same reasons and to make up for the loss I added cocoa powder to the boiling wort. The results: a wonderful brown with the complimentary flavor of toasted almond and toffee. This beer has a warm nutty character with subtle chocolate notes and a definite almond presence. This is a great beer for the season even though the alcohol is low the flavor is big and satisfying. Here's lifting a glass to Joanna for generously contributing to a delicious holiday brew.

The following is the 10 gallon recipe for an American brown ale using Joanna's famous almond toffee.

Added ingredients

Eff. 90%
attn. 79%
abv 5.25%
srm 18
ibu 26
og 1.048
fg.1.010


Mash in 5 gals. h2o at 158f. for 60min.

14lbs. of 2-row
8oz. chocolate malt
2oz. roasted barley
4oz. aromatic


Sparge with 10.5gals h2o at 170f. for 40 mins to achieve a 90% efficiency

Boil wort vigorously for 60 mins. with -
12oz. Joanna's seasonal almond toffee (placed in a nylon bag to capture almonds)

1oz. Columbus hop pellets at 14% alpha acid for 26 ibu's

Add 2oz. Hershey's cocoa powder for 15 mins. of the boil
Add Irish moss for 15mins. of the boil

Chill to 65f. and aerate going into fermentor and add 2 pkgs. of us05 dry ale yeast
ferment at 65f until complete


Tuesday, December 7, 2010

How To Drink Beer And Not Influence People

I'm sitting at the bar of a crowded brewpub facing off a spread of samplers of beer with an attitude of open mindedness. Halfway through the four ounce tasters laid out before me from light to dark with the specialties set aside, I'm taking in the environment and checking out the brewing equipment behind plate glass windows beside me, trying to see if any brewing action is taking place. It's at this moment that I notice in the reflection of that same plate glass the image of a full table of patrons seated over my right shoulder, one pointing in my direction. One has her hand over her mouth stifling a horsey laugh while another holds his pint glass up to the light in mock admiration. All were unaware that they were being observed and the mocking only lasted a few seconds but it lasted long enough to deflect my attention.


The Pinky Extend

It came as a snapshot of embarrassment for me, and a moment of recognition. Like a postcard held at arms length, it revealed to me what must have appeared an aberrant specter in an otherwise normal setting. Here I am sitting alone with my line up of beers paying tribute to an absent brewer and pretending I'm doing something important when in fact I'm simply squinting through the side of a glass. Those around me don't know what I'm staring at, they may suspect I've discovered the image of the virgin of Guadalupe looking back at me from the depths of the amber liquid.  I'm filled with a momentary flash of shame that feels like I just got caught in a lie. But if this shame is false, I reason, then I can push it away and finish what I started here, put it out of my mind and go back to evaluating beer. Still, it makes me want to think of solutions, which is where my mind goes when I'm not sure of the truth.

As my desire to experience commercial beer grows with my passion for homebrewing, so grows my aberrant behavior. I don't want to come off as a pretentious beer snob, but I do want to fully appreciate the beer I'm drinking, and in order to do that I need to pay attention and use techniques that fully utilize my senses. Sometimes this behavior can appear to be suspect and so a bit of discretion needs to be applied. Below, I have identified the type of  negative tendencies which I do that can cause ordinary patrons to point and laugh. These tendencies can be eliminated or modified to reduce the amount of shameful beer based feelings in the future.

Things I will and won't do at the bar anymore while tasting beer.
  • Don't fill out a paper score sheet ranking the beers on a scale for aroma, appearance, flavor
  • Do quietly speak into a small hidden microphone clipped to the shirt collar and connected through a thin wire to a digital recorder concealed in a pocket
  • Don't raise the glass towards the window to use the sun for checking the color and clarity
  • Do bring a mini-mag flashlight to shine through the glass to capture the ruby highlights, additionally this can be hidden from the public in a cloak of darkness by pulling a jacket up over my head
  • Don't smell too long, cupping hands over the glass while swirling the beer vigorously to create foam
  • Don't breath in deeply with flair nostrils causing whistling sounds
  • Don't exclaim righteous approval with exaggerated bodily gestures like high fives to the air
  • Do express approval with subtle quivers, stifled belch, slow motion head nod, raised eyebrow (left or right but never both at the same time), smile on the inside, etc.
  • Do feel free to take another taste to confirm the initial thought and then repeat
  • Don't describe the subtleties that go unnoticed out loud to no one in particular
  • Do use the previously mentioned hidden recorder to quietly describe subtleties, or just use the voice in your head, the one that has conversations with itself 
  • Don't put an arm around the nearest person and confide "You know what I mean don't you?"
  • Do consider putting your arm around the nearest person, then don't
  • Don't cross arms in adamant confidence and make proclamations to the wait staff, subtle and quiet at first then gaining volume with each insistent declaration
  • Do express appreciation to bartender or wait staff, in the form of a tip 
I've found that enjoying a beer to it's fullest is possible while immersed in the general population but discretion is key to being accepted as normal. I shall continue to expand on the list but with what I have so far, I believe the next time I'm sampling beers, with this list in hand I can refer to it and be confident that I'll exhibit prudent action.

Is that what I really want?

Monday, November 22, 2010

Lagunitas Hop Stoopid

Brother John from Tacoma suggested from his Facebook page that I give Lagunitas 'Hop Stooped' a try. He was halfway through a pint and raved about the great flavor. In search the next day, I found a bottle of it at 41st. Liquors in Capitola and thought I'd yak about it here.
This is a big beer, not just in the hop profile which I expected but also in the alcohol volume. It comes in strong with 8% abv. and boasts 102 IBU's. Hop Stoopid is a beautifully clear copper beverage with moderate carbonation. A good balance of caramel malts and fruitiness offset the huge and pungent hop flavors and an ending gravity of 1.020 leaves enough sugar in the mix to make for a round, full mouthfeel. But it's the hops that dominate the scene here and will definitely satisfy any serious hophead.

Hop Stoopid!

Some interesting information from the label reveals hidden secrets to brewing this beer at home. For instance, considering that the alcohol content is 8% and the original gravity is 1.085 you can calculate that the final gravity had to come in at 1.020 and that the attenuation was 76% . This leads me to speculate that the yeast used was probably not your typical California ale yeast like Whitelabs wlp001 or Safale us05 since these yeasts will attenuate in the 80%-85% range. This narrows the field slightly causing me to speculate that they may have used an English ale yeast like Whitelabs wlp002, this yeast would impart the fruit character in addition to the low attenuation which imparts the fullness in the mouthfeel, and possibly the incredible clarity.

Another component that deserves some attention is that fact that hop extract is used late in the process to achieve the over-the-top hop aroma/flavor. As a homebrewer, this could be duplicated by making a hop tea with a French press as discussed before on this blog.

I enjoyed this beer although I could not figure out what type of hops were used in the boil except to note the pungent/piney flavor. I would think that a decent amount of Columbus was used but this a wild guess on my part. If there are any experts out there (read Lagunitas brewers here) that could give us a clue on that aspect, I'm sure it would be hugely appreciated. Lastly, this beer did cause me to visit the edge of sobriety after consuming the 22oz. bottle by myself, not that there's anything wrong with that.

Tuesday, November 16, 2010

Beer Diary... In Brew Your Own Magazine

Just received my latest addition of Brew Your Own magazine and was happy to see the 'Last Call' article about the brew school I teach at Cabrillo College. For those that don't have a subscription to BYO you can order one through this blog by clicking on the link at the bottom of this page. In the mean time read the unedited version of the article here.


Students studying the basics of brewing

Homebrewer takes his passion to the classroom

Ten years ago I caught the homebrewing bug after attending an afternoon demonstration at the local homebrew supply store here in Santa Cruz, California. It was a beautiful spring day and grain was mashing in the tun when I arrived at Seven Bridges Cooperative. A small clutch of us gathered around a modest brew rig, asking simple questions and taking in the aroma of malt and hops. Remembering back on that day I don't think I understood much from the explanations we were given and attributed my fascination with the days events to be a combination of the artistry on display and what seemed like sublime alchemy. I immediately bought a beginners kit and the basic equipment to brew up an extract batch of beer. I haven't stopped since, expanding on my knowledge and abilities from one batch to the next. Most of what I've learned over the subsequent years has come from getting involved in my local homebrew club, the Zymurgeeks, reading brewing literature, participating in on-line forums and diligently practicing the craft.

A couple of years ago it occured to me what a benefit it was to have been introduced to this great hobby in such a hands-on way, and that others like myself could benefit from the structure of a classroom environment to learn to brew. I noticed a gap between schools for the professional brewer, like Siebel Institute and U.C. Davis, and the occasional local homebrew store demonstrations. It also seemed like it would be an asset to the community plus a chance for me to share my knowledge and passion for homebrewing.
Based on this premise I developed a curiculum for a comprehensive yet practical program, a five day course for teaching homebrewing that could be offered through community college extension classes. Once my idea was developed, I mailed out application letters with my proposal to half a dozen nearby schools.


Class photo

Cabrillo College in Soquel showed an interest after some initial reluctance over a concern that the subject would not draw the needed interest, but the class soon filled with eager students and I scheduled the first series. The course is scheduled for five Sundays in a row utilizing the week between classes for beer to ferment and the students to integrate the lessons and/or practice on their own at home. Each lesson builds upon the previous, taking the students from the basics of brewing with dry malt extract and steeping grains, continuing through the more advanced knowledge of partial mash brewing and finally brewing ten gallons of an all-grain batch. All participants get the chance to have hands on experience with the equipment and materials used in brewing, chilling, fermenting, bottling and kegging, along with the academics of the basic calculations used for testing efficiencies, attenuation, alcohol content and much more. In addition, consideration of the malt bill, hop utilization and yeast selection for developing their own recipes beyond the introductory kits available at the local homebrew store is studied. As a class, we also sample beer styles, homebrew and commercial examples, with an emphasis on sensory evaluation techniques. On the fifth and final day of class the students bring in food to pair with three of the four beers that they brewed in class, enjoying the satisfaction of sampling the results and to critically evaluate the 'fruits' of their labor.

I have been teaching this class for three years now and it continues to be popular and well received, getting good follow up reviews from the students. This is partly due, I believe, because it gives them an opportunity to directly experience the brewing process, a chance to test the waters, so to speak without a commitment to the hobby or to the initial costs of equipment and materials. Many students continue with the hobby and become actively involved in the local brewing community.
I feel proud to be able to offer this class through an organization that recognizes the value of homebrewing.

Student testimonial-
"That was a great class. You did such a good job of making the process of brewing at home comprehensible without oversimplifying, and showing us we could all do it. The more brewers in the world, the better! Thanks for sharing all your knowledge and experience with us."

Tuesday, November 9, 2010

Midas Touch Clone

I convinced fellow homebrewer and Zymurgeek club member Mark to brew a clone version of the Dogfish Head Midas Touch with me this last weekend. This is an interesting beer in that it is based on the dried out spurge that was stuck to the inside of an ancient urn that was discovered in what is considered the 'fertile crescent' of Mesopotamia. After analysing scrapings (the spurge) from within the urn scientists were able to identify the ingredients and a recipe was developed that is suppose to mimic that of the original fermented beverage.

I sampled Dog Fish Head's recreation and thought the flavor was o.k. if not a little sweet with an emphasis on the grape character but what ultimately drew me to brewing this beer was the idea of recreating a brew that was drunk by peoples from thousands of years ago. I like that.

We decided to use Mark's brew system which was protected from the days rainstorm under a tarp by his garage and I settled in as assistant by pouring myself a pint.  


Adding saffron
 Here is the recipe from the byo article. I got this on-line from their website and doubled the recipe for our ten gallon batch. Here's the problem if you decide to brew this beer. The recipe does not provide the sugars needed to get you to the gravity of 1.078 I ended up changing the amount of grain used from double (12 lbs.) to 17lbs. and planned on an efficiency of 80% Thus providing a gravity of 1.045 in 11.5 gals.  We used 6lbs. of honey at 1.033 which gave us 1.017 and the grape concentrate which claims to be 68brix gave us another 1.023. Now you probably figured that we should have had a gravity of 1.085 but we didn't. We ended up with 1.074 instead and we don't know why. So, we added another can of grape concentrate and reach 1.080. My conclusion is that the sugar obtained from the grape concentrate is far less than stated.

On the flip side, the recipe which claims to come in at 1.078 is not high enough to get the abv. amount of 9% stated on the label of the beer. Even if you achieved an attenuation of 80% you will only get an abv. of 7.75% so if you make this beer, beware and adapt as needed to achieve the desired results.

When all was said and done, we got up to 1.080 which should get us a little over 8.6% abv. if we are able to attenuate down to 1.010 or 87%, I don't see that happening. Most likely we'll get 80% attenuation and end up with a final gravity of 1.016 and an abv. of 8%. If anyone knows where we went wrong, let me know but look at the recipe on line first and tell me what you think of their formulation. It may be a good recipe but it doesn't get you the numbers you're looking for.

Back at the brew session: A teaspoon of saffron was added at fifteen minutes left in the boil along with some yeast nutrients and the Irish moss. The saffron looked pretty minuscule in that much wort, just floating around looking like a waste of eight dollars. At the end of the boil we poured in the honey and began chilling the wort with an immersion chiller. Once chilled to 70f. we transferred to our respective carboys and added the muscat grape concentrate and added oxygen from cylinders for maximum aeration.

We then pitched a large quantity of WLP500 Trappist ale yeast that I salvaged from a previous batch of tripel I made several weeks earlier.After four weeks in the fridge, the yeast was still very viable.

The following morning the yeast was fermenting nicely. I'll tell you how it comes out. I plan to bottle and condition this beer for 4 or 6 weeks and I think this will make great gifts for Christmas and new years for the next several years to come.

Monday, November 1, 2010

Uncommon Brewers 'Siamese Twin'

I'm proud to say I live in a community that is home to not only an organic only homebrew store, but also to one of a select few breweries in the nation that can boast the use of "all organic" ingredients. Santa Cruz's own 'Uncommon Brewers' is not only brewing with organic ingredients but some strange ones to be sure. I sat down with a pint (a pound of beer?) of their flagship ale 'Siamese Twin' to get an insight into what is brewing at Uncommon.

This is a Belgian style dubbel but not your ordinary Belgian beer. It comes at you with a traditional alcohol percentage of 8.5% and all of the qualities that I've come to enjoy in this type of beer. Full-on malt character with caramel, dried fruit flavors including raisin and prune and all-spice notes provided by the yeast. That's where tradition ends and the unique flavors of nontraditional ingredients begin. Lemongrass, coriander and kaffir lime bring a tart acidity into play that reminds me of a Flemish brown reminiscent of Petrus oud bruin or Duchesse de Bourgogne with the lingering sweetness that interplays with the sour. This quality really shows up especially in the nose.


This is an interesting and delicious take on a classic style and if you can get a can of it in your area, jump on it. It may shock you at first because it doesn't fit into your style expectations but as you stay with it you'll be claiming it as a regular selection in your beer fridge.

In the mean time, I just happen to be passing by the brewery and was allowed to wander unattended through the facility as work was in progress canning a batch of this beer. It's unbelievable but every can found out there on the shelves of your local liquor store or supermarket has been packaged by hand. The following video will give you an idea of what it takes to can 600 gallons of beer by hand, one at a time.


Canning beer at Uncommon Brewers
P.S.  Join the beer enthusiasts. Click on the 'Follow' button.

Wednesday, October 27, 2010

Dunkel Weizen Eisbock


Making an eisbock is a relatively simple procedure, and according to the German Beer Institute web site it goes a little something like this:
"Because water freezes before alcohol, the chilled brew can be drained off the ice crystals that form in the tank. During this process, the beer loses about 7 to 10% of its water content. As a result, the alcohol concentration in the beer increases, usually to about 10% by volume, about twice as much as the 4.5 to 5.5% of a regular German lager." 

I've thought about doing this for a long time now. The actual doing part didn't happen until recently because of an unfortunate blockage in my mind. Because I was focused on accomplishing the task with five gallons of beer, I just assumed that I would need to somehow get an entire corney keg in a freezer and somehow remove the ice from that container and then carbonate the remaining concentrate left in the keg for dispensing. I know it seems strange, but  it never occurred to me until the other day, that I could simply dispense a small amount from the keg and do the process on a small scale. The following is the process I used to increase the alcohol percentage of my weizenbock by extracting the frozen water content by about 50%. First let me get out of the way the fact that an eisbock is traditionally made from a lager or bock beer but in my case I will be using a dark weizenbock (dunkel weizenbock?) that has an alcohol by volume of 7%. In my case this is ale. Again, from the German Beer Institute:
"Eisbock can be made as a barley-based lager, like the Reichelbräu G'frorns, or as a wheat-based ale, called Weizeneisbock. The Weizeneisbock most readily available in North America is the Schneider Aventinus Weizeneisbock, which is brewed and then frozen to a strength of 12% alcohol by volume."

Secondly, even though this is not a distillation but rather a concentration of alcohol, it is still prohibited by law. So if you're reading this, don't tell on me. Anyway, I drank the evidence.
The following is one way to make an eisbock and how I did it this time.
I began by dispensing two litres of beer from the keg into a large pitcher and placed this container in the freezer. It took several hours for the beer temperature to drop to the point of freezing but I kept a close eye on it so that I didn't freeze the surface area too deeply. Once I saw that freezing was beginning I started the process of removing the ice crystals from the surface of the container.
The other way to do this is pouring the unfrozen portion off and placing this back in the freezer but I choose my method because it seemed easier at the time.
I used a perforated spoon to scoop out the ice and then I held the ice over the pitcher in order for the unfrozen liquid to drain before completely removing the ice. I also saved the ice as the process continued and after it melted I drank this beer because it still contained some remnants of the beer flavor and alcohol.
I repeated these steps about a dozen times and this took many hours to complete. I would recommend starting early in the morning to finish in one day. I started too late in the day and ended up placing the beer in the fridge until the following day to complete the task.

Finally, after reducing the volume of beer by 50% I stopped. I ended up with a one litre soda bottle pictured here. I placed a carbonating cap on the bottle and hooked up a co2 line from my kegerator to carbonate.
The results were great. The beer was an amped up version of its old self with intense malt character but with a smooth rich dark, dried fruit flavor. I didn't get any alcohol presence in the nose or taste like Aventinus.
Unfortunately, because it was such a small amount of beer, I didn't take a sample for a hydrometer test and so I don't know the final alcohol content.
The up side to this experiment is that it is pretty easy to do and so I'll be taking a sample of my Belgian tripel which has an 8.75%abv. (tripel bock?) and reducing it in the same manner. I'll make sure I take a reading with that one and report back here with the results. Cheers!

Friday, October 22, 2010

National Organic Brewing Competition Results

For all those interested in the results of the Organic Brew Contest here are the winners. This event was sponsored by our own local homebrew store Seven Bridges. There were 121 entries, representing at least 600 gallons of beer that were all brewed with sustainably grown, pesticide free ingredients.

Sadly, my pale ale didn't place. I haven't received the score sheet for it yet so I can't say what the judges comments were. I'm looking forward to hear what they have to say. On the bright side, a couple of my former brew school graduates Gresham Andrews and Dave Kramer-Urner took a second/third place award for their "Average White Brew" American Wheat and also a third place for their American Amber Ale. Congratulations guys!

A couple of local breweries brought home some awards. Uncommon Brewers and Santa Cruz Mountain Brewing both doing well in the contest using only organic ingredients.

Congratulations to all those that took the challenge to brew with organic ingredients and those that took home prizes for their efforts.


Tuesday, October 19, 2010

Brewing With Found Objects

    When I first started out brewing I bought the standard and least expensive beginners equipment set. This included a thirty quart brew pot, plastic bottling bucket and an assortment of miscellaneous bits and pieces to make and bottle a five gallon batch of extract beer. I think this is probably the way that the majority of beginners start, modest and cheap at first to make sure the hobby is going to take, before spending too much on what may turn out to be just more clutter for the garage.
    
    Scrap metal yard
     
    Here's the interesting discovery about myself as the hobby indeed did 'take' and my passion for brewing beer grew. The new upgrades that I purchased for my system were not the brand new off the shelf items from the local homebrew store but instead tended to be found items located in unusual places. I learned that I enjoyed the hunt for brew gear and began to consider it a big part the creativity of the brewing hobby. I also found that being a homebrewer brought out the cheapness in me, I didn't want to pay retail on a new item if I could find it used or find an alternative item that had a 'cool' factor to it. This satisfied my desire to hunt and to be cheap while making my favorite chilled beverage. As time went on, my attention to locating brewing stuff became a natural focus, enabling me to find obscure items from long distances, that's right, I discovered my super power. Often the best items would be found in the most unlikely places.


    For instance, while spending the day with my wife wandering the historic down town area of Anacortes Washington, we happened upon a boat supply store that carried salvage parts for resale. Off in the corner of this dusty store packed with shipyard surplus was a bin of mercury thermometers made of brass with glass covers, apparently stripped from the boiler an old tug, what a score. I picked one out and spent only a few dollars for not only a functional tool but a showpiece for my hot liquor tank. It's strange how I remember that moment so clearly, I think the sun was out the day too.
    
    
    Flea markets


    Hardware stores
    
    I don't think I'm speaking just about myself when I say that as a homebrewer I'm also interested in saving money and that this often comes across as cheap. Whenever I talk with other brewers this subject ranks right up there with what to call a black IPA and what's in the oak barrel. But I like to consider that this is just about the enterprising attitude that seems to go hand in hand with brewing my own beer. I sincerely hope that I'm not cheap to begin with and that's why I brew. Anyway, for me, found objects to brew with is as important as full bag grain prices and buying hops by the pound.
    
    
    I've also come across some scrapped beer kegs that I use for boil pots at the scrap metal yards along with other stainless steel items like the perforated false bottom material and beer faucets and a bunch of corney kegs. There are many unorthodox places to locate brewing equipment gems if you're willing to keep your eyes open and your mind focused.

    Here is a suggested list of other places to explore that may have the potential for great finds: 
    • Flea markets are a great source of brew stuff for example I've found carboys, kegs, tap handles and more over the years.   
    • Hardware stores with an eye for brewing equipment. I've picked up parts for braided hoses for my mash tun filter, parts to make hop bag device,etc. I also, keep my eyes open for anything plastic, stainless steel, copper, brass, or wood as any of this could be used in some fashion for brewing.
    • The local homebrew club. Other homebrewers with stuff they don't need. Make an offer, sometimes they just give it to you because they have more than enough or it's in the way. A fellow brewer gave me a great deal on a mill because he upgraded to a better style.
    • The recycle bins at the dump. I've got a couple extra 20lb. co2 tanks from there not to mention another keg.
    • Manufacturers. I noticed some nice food grade bins at a candy manufacturer recently. Although I didn't ask for one I will keep the information in my head for any future need, they could make great open fermentors.
    
    When I'm focused on brewing, anywhere I wander my eye will catch that chrome or stainless metal that could be a brewing related item or could be made into one. I abruptly pulled off the side of the highway recently because I saw a nice gas hose and regulator coming from the side of a propane tank. Turns out the road paving crew was currently using it but hey, can't hurt to look (I was a little embarrassed).You'll never know where you'll find the next great score, and with an intention to discover the brewing equipment you want or even don't want, it will surface when you least expect it. Cheers, and good hunting.

    Friday, October 8, 2010

    A Little Extra Beer Part - II

    I messed up a little on this project. Or was it the yeast. I don't want to blame an innocent microbe for my problems so I won't name any names wlp500 I'll just take the full brunt of this failure like a man.
    When I racked the beer from my tiny fermentor I didn't take a gravity reading until I'd filled the bottles and capped them with a priming tablet and set aside. When I did check the gravity I found that the beer was way under-attenuated (50%) even though it showed no signs of activity. My excuse -
    1. this was a new project with unusual and unfamiliar procedures so I forgot the basics of checking the gravity to confirm that it was finished
    2. in my anxious attempt to document/film the next step in this project, my focus switched to preparing an interesting blog post rather than the need to pay attention to the basics of my fermentation procedures
    3. impatience is my inner demon, bent on destroying my brewing equanimity
    4. too many beers that day  - and finally-
    5. the sun was in my eyes
    On top of the fermentation problem, I couldn't stand allowing the beer to continue conditioning in the bottles knowing it was screwed up, as if I wasn't going to eventually poured them down the drain.  So, I opened one after only a week in the bottle and tasted it. Guess what, it is extremely sweet and guess again, it's flat. Should I empty the other two now or wait for....for what? At this point, I think I'll let them set in the bottle for another week or so to see if they blow up. Bottle bombs could be the silver lining in all of this. Picture me hanging my head in shame here.

    In any case, I hope you enjoy the video as it was the one aspect that I claim to have some modest success.


    In the mean time, the two other bottles of this beer that are carbonating into what I hope will be colossal bottle bombs and timed to go off with malicious contempt, are tied up in a strong plastic bag to hopefully prevent the mess inside from ejecting onto a perfectly good carpet.

    Monday, October 4, 2010

    Bog Myrtle Beer 'Gageleer'

    Gageleer beer is an interesting take on a Belgian ale, oh, it is a Belgian ale but nothing like I've ever had before. This is an organic beer brewed with an addition of sweet gale which is also know as bog myrtle. I like the sound of bog myrtle, bog myrtle, it kind of rolls off the tongue and makes me think of an ingredient in a witches brew like eye of newt. This may not be far from the truth as the leaves of bog myrtle, with its sweet resinous scent, have been used over the ages as a traditional insect repellent. You can read about the ancient remedies of bog myrtle here at Wikipedia which covers some of the medicinal values of the herb. But what intrigued me most was the reference to the use of sweet gale as an ingredient in beer prior to the use of hops.

    The 7.5% abv. isn't evident during tasting but what does come through is a thin, watery version of sprite, a lemon/lime character but on a very subtle level. I have to say that the beer is unique in this way but not offensive and at the same time does not draw me in for another glass. Their website claims minor notes of eucalyptus but I didn't get that. It's hard to put a finger on the flavor qualities of this beer other than mild mint and sweet. Even though this is a beer from Belgium, if I brewed it for a competition I would enter it in the BJCP category 21 section (spice/herb/vegetable beer), as I doubt I would get a good score in the Belgian styles.

    Finally, I'm not a artist in any way but I could probably come up with a better design for the label, maybe add a little color or an image of some
    boggy lowland with sweet gale thrusting
    up from the nitrogen starved soil, just sayin'.

    Tuesday, September 28, 2010

    Beer Ice Cream

    Out of nowhere I received a letter in the mail, you know, those paper things that pass from hand to hand until reaching it's destination in far off lands. In this case traveling from Michigan to California. I'm always a little surprised when I get something in the mail that isn't a bill or and ad. It restores in me a sense of hopefulness that is often obscured by the grind of daily life. This letter came to me from contributing writer and loyal Beer Diary... reader 'Mom'. Yeah, when you think that nobody reads you, there's always Mom.

    Turns out that she was doing a favor for a friend by forwarding a newspaper (South Bend Tribune) clipping that her friend Anne had asked her to give to me. Apparently, Anne shares an interest in brewing and beer because of the influence of this blog, or more likely because of the bragging my mother does about her children. By the way, for you young'uns not familiar with this cultural imperative, saving and passing on clippings is a popular past time in the Midwest. As important as jello with fruit cocktail and mini marshmallows which is referred to as salad along with fourth of July bonfires fueled with pallets and full sheets of plywood and heavy doses of liquor.  Whether it's coupons for the local grocery store, fascinating news and anecdotes or in this case valuable recipes, clippings are as Midwestern as apple pie and all of them are a way of communicating concern for and an interest in the welfare of family and friends.

    Anne considerately affixed a post-it to the clipping that said "Hi Mark, thought you might get a kick from this recipe. Best regards, Anne (the one for beer ice cream)"
    The cut out has several other recipes in it and I guess she thought I might not understand. Very sweet.

    Even though I rarely post about food, out of respect for Anne's thoughtfulness I decided to post this recipe for all the Beer Diary... readers and newspaper clippers out there in the blogosphere.
    I hope you enjoy:

    Beer Ice Cream
    Total time: 20 min. plus freezing time
    Serving: 2 to 4
    Adapted from Matt Schreiver, who adapted it from Antoine Westermann at he resaurant Beurheisel in Strasbourg, France.

    4 egg yolks
    1/2 cup sugar
    1 cup beer (type not specified)
    1 cup heavy cream

    In a medium bowl, whisk the egg yolks with the sugar until they are pale and lemon-colored. bring the beer and cream to a simmer in a heavy-bottom saucepan, then slowly pour over the sugar mixture, whisking constantly. Return the mixture to the pan and cook over low heat, whisking frequently, until it thickens.
    Pour through a strainer into a mixing bowl set over ice and whisk until cool. Freeze in an ice cream maker according to manufacturer's directions.

    If I had an ice cream maker, I would try this and tell you how it turned out. If anyone gives this a shot, report back please.

    Saturday, September 25, 2010

    A Little Extra Beer - Part I

    I began my day with plans to brew a big beer, an all-grain Belgian Tripel, one of my favorite styles and worthy of having a keg on tap at all times. But in the brewing process, I ended up with about a gallon of additional running's at the end of the sparge.

    I didn't plan for this extra project when I started out this morning brewing my take on a Belgian tripel. I simply went about my business as usual but was unaware of the gallon or so of additional water in my hot liquor tank or it could be that I just didn't care that much, once the water was there. Normally I'm careful to calculate the amount of sparge water I will need in order to run all of it out of the HLT, through the mash, and finally end up with thirteen gallons of wort to begin my boil. This time, when I got to thirteen gallons in the boil kettle, my mash tun was still flowing and so I diverted the flow to a separate vessel and waited to see how much I would collect. I eventually ended up with close to a gallon of wort. Now, even though I got a great efficiency from my sparge, I checked the gravity of this extra gallon and found that it was still at 1.025, I couldn't bring myself to toss it so decided to boil it on the stove top.

    
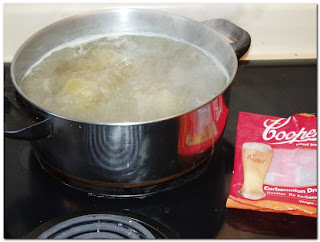
    Cooper's drops to increase gravity
    

    In the mean time, I still had my brew session going on outside and in that process had used up all of the cane sugar I had on hand for the recipe. Thinking quickly, I dug into my brewing supply bin and came up with an open bag of Cooper's carbonation drops. The bag still had about eight ounces in it, perfect to raise the gravity of my little beer. Then, I measured out about 2/10th's of an ounce of Saaz pellet hops and added that directly for the entire 45 minute boil. After the boil, I chilled the wort to 65f. by placing the boil pot on a bed of ice. At this point I had about 1/2 of a gallon for wort and checking the sugar content, I came up with an original gravity of 1.064 or about twenty gravity points lower than the 10 gallon batch of the same. I then poured the wort through a sanitized funnel into my tiny fermenter, a Martinelli's apple juice jar, and added a small portion of the yeast starter that I'd held back when I pitched for the ten gallon batch. I was just lucky that the airlock fit this jar but if it didn't I guess I would have simply covered the top with a piece of foil, I personally don't think it makes that much difference having an airlock unless you plan to keep the beer in the fermenter for an extended period of time.

    mini fermenter to the rescue

    As of this moment, the mini fermenter is percolating nicely with happy yeast activity. I have no idea about how this will taste and frankly don't have any expectations, but going off the beaten path every now and again makes for a more enjoyable hobby and could lead to new possibilities. Maybe I'll make this a regular part of my brew day, mixing up my tiny batches with weird and unusual ingredients just to see what comes of it. In part II of this project I'll talk about crash cooling, transferring and carbonating on a miniature scale and talk about how this small beer tastes.

    Friday, September 17, 2010

    Hop Infusion Using A French Press

    If you keg your beer, here's a effective and simple way to add extra hop flavor/aroma to those beers that benefit from the additions. Specifically pale ales, India pale ales and Imperial India Pale ales. I recently used this technique with my Cascadian or black IPA with great results. It's an easy process and not only can you infuse any desired level of hop flavor/aroma, you also get another thrifty benefit, the used hops can be bagged and set in the freezer for future use as bittering hops in your next brew because this procedure simply removes the aromatics that you want and leaves behind the alpha acids necessary for bitterness. If you want an even bigger impact, use this process and also dry hop with another charge of hops. In my case, I used a stainless steel tea ball with half an ounce of pellet hops suspended in the keg for several days. This time I just dropped them in without any further processing like I've done in the past, which you can read about here.


    Here is how I use this technique. First, I pour myself a beer. Then, I measure out the amount of hops I would like to add to the keg and place those in the coffee press. I've done this with both whole hops and pellet with fine results, for me a lot of it is a matter of what I have on hand.


    Heat enough water to cover the hops in the press to a temperature of 170f. approximately, but no hotter than that, as it may extract too much bitterness.


    Add the hot water to the hops in the press and let rest for 15 to 20 minutes. I add about two cups of water and expect to lose about half of that as the hops absorb the liquid. I end up with a cup of liquid going in the keg. You will have to experiment to get the right ratio of water to hops for your desired results and you may have to play with it a few times to get it to your tastes. There are no hard and fast rules to this, you just have to mess with it.


    Press the hops down as far as possible allowing the hop infused water to rise to the surface. Pour this liquid into another vessel and set in the freezer until it cools to the same temperature of the keg that you will be adding this solution. Taste to make sure it has the flavor you were expecting, you don't want to dump this in you precious beer if it isn't to your liking. Gently pour the liquid into the beer and re-seal and pressurize the keg.


    I would recommend beginning with a small charge (1 oz. or less) to begin with and adding additional hops to taste or adding dry hops to augment your results. You can also use this process to add bitterness to a beer that may have turned out too sweet for you, maybe under attenuated or just out of balance. Simply heat the water to boiling temperature and leave the hops in it for an hour and add as noted above. It's easy to go too far doing this so tread gently and ramp up as needed.

    If you do this, leave a comment on your technique.

    Related Posts Plugin for WordPress, Blogger...

    About Beer Diary...