Thursday, July 3, 2025

Bottle In A Bag


Improvising with Style: A Homebrew Hack Worth Keeping

 I ran into a bit of a special needs situation last week, and figured it was worth sharing—not for sympathy, but because this is what I love about homebrewing. No matter how many batches you’ve clocked, something will always go sideways. A missing part, a busted seal, or in this case a completely disgusting bottling bucket. The unexpected shows up, uninvited, and dares you to stay creative.


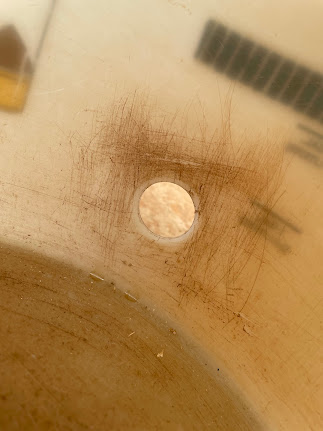
So here's the scene, I'm in my element puttering around the brew cave and I'm needing to bottle a batch of porter. Easy enough—except the only bottling buckets I had looked like they’d been dragged through a gravel lot and left to soak in dirty dishwater for a few years. Discolored, scratched to hell, and definitely not the sterile environment you’d want for your pristine, freshly fermented beer. Unless, of course, you're into doctoring your brew with unknown bacteria strains and suggesting that it's a Belgian such or such.


What to do?

Now, for many of you who've wasted time following this blog know, I normally ferment in garbage cans lined with food-grade plastic bags—sterile, easy to salvage yeast, cheap. Turns out, those same bags are the perfect workaround when your bottling bucket is more biohazard than brewery tool.

Here’s the move: line the nasty bucket with a clean, sanitized bag. That way, your beer never touches the inside of the bucket, and you keep the precious liquid safely quarantined away from those bacteria harboring crevices. But what about the spigot connected to your nasty bucket you may ask? Well, you're still going to use it but you will simply re-install it with the bag in place.


First, prepare yourself. Wash your hands. Like, really wash them and I like to dip them in a solution of acid to be safe to make sure I'm not introducing anything into the bag when I'm installing the spigot. 

Drop the bag liner into the bucket, I had to trim off some excess, a couple feet at the top. It was comically tall as my fermenting garbage cans are about 15 gallon compared to this 6 gallon bottling bucket. With bag in place I insert the spigot as normal through the usual hole in the bucket, pushing it through and up against the bag. Then, from the inside of the bag at the point where the threaded part of the spigot pushed up against the bag I pressed on the washer and then threaded on the nut over the bag. This locks the spigot in place and seals the bag tight around it.


Now, with everything snug, I pierced a little hole in the bag at the mouth of the spigot to let the beer flow through. Bottle as usual. Beautiful. The beer stayed protected in its sanitary cocoon while I bottled like usual. When I finished, I dumped the dregs, pulled the spigot, and lifted out the bag—no scrubbing, no sanitizing, no bucket shame. The bucket underneath? Still filthy. Still disgusting but it never touched a drop of beer.

I liked the results so much I’d use this trick even if the bucket was brand new. It’s too easy not to. And in homebrewing, anything that saves you time, cuts out cleanup, and still treats the beer right? That’s my kind of solution.

Cheers.


Sunday, June 15, 2025

Kirkland Helles lager


Best beer value

 Kirkland Signature — a name that conjures bulk toilet paper and thirty-pound bags of trail mix — also makes beer. Or rather, they commission beer. And not just any beer. These cans of budgeted bliss are contract brewed by Deschutes Brewery, which, as far as breweries go, is like finding out the gas station hot dog you just ate was actually made by Thomas Keller.

Their Helles — that’s “light” in German, though in beer it just means “not IPA” — is clear, golden, and practically screams, “Drink me while wearing cargo shorts.” At 4.5% ABV, it’s light enough to keep you from falling face-first into your lawn after three, yet satisfying enough to make you think, “Huh. Maybe Costco does know what they’re doing.”

It’s crisp, bready, ever-so-slightly bitter, and—perhaps most importantly—cheap. $14.60 for a twelve-pack (that’s 276 pesos if you’re playing the home game in Mexico). It even won a gold medal at the 2023 GABF, which makes it, technically, an award-winning beer you can pair with discount socks and an eight-pack of canned tuna.

Meanwhile, back in my kitchen, things were less award-winning and more—how shall I put it—frontier survival. I’d just finished mashing in a batch of my Black Butte Porter clone when the power cut out. Mid-sparge. That’s like getting halfway through brushing your teeth and realizing the water’s been shut off. With no pump to move water from the hot liquor I had to resort to the tried and true technique of scoop, pour and repeat. Like a one-man bucket brigade at a slow moving fire.

Wort collected, I faced another problem: boiling. Not the act, which is simple enough, but the timing. I couldn’t risk starting the boil without knowing I’d be able to chill it down and transfer to the fermenter. Because nothing says “tragedy” like a kettle of lovingly hopped wort gone tepid and sour in the dark.

So I waited. Sanitizing obsessively and checking the lights every ten minutes like a raccoon hoping for leftover pizza. Four hours later, the power blinked back on, and I fired up the burner like I was reviving Frankenstein.


In the end, the beer made it safely to the fermenter and seems, at this point, to be fermenting peacefully—unaware of the domestic drama that brought it into the world. This little mishap did get me wondering whether I should rebuild my old gravity-fed brew setup from California. A solid Plan B, sure, though still powerless against the whole "needing to chill the wort" issue unless I also invest in a hand-cranked glycol chiller powered by anxiety.

Anyway, I’ll keep you posted on how the porter turns out. If nothing else, it’ll pair beautifully with a bulk package of relief and a Kirkland hot dog.

Cheers.


Thursday, June 5, 2025

Brewing an IPL

  India Pale Lager (also called a Cold IPA in some corners of the beer world) is, at its core, an IPA fermented with lager yeast at cooler, lager-friendly temperatures. It’s not rocket science—just a way to get all the bold, hoppy character of an IPA with the clean, crisp edge that comes from cold fermentation.

I like them because they are the complete opposite of the beers I truly abhor: those murky, overly fruity New England IPAs. India Pale Lagers are a West Coast style, which naturally means they’re superior to anything being brewed in the Midwest or East Coast. (Sorry, but it had to be said.)


And let me just say—it’s been refreshing to see the haze finally clearing from tap lists. If I'm lucky, the hazy craze is on its way out, and clear beers are reclaiming their rightful place in the lineup at my favorite breweries. If I'm really lucky, those “hazies” will occupy a single tap which I believe is a fair share of the taproom landscape.

It’s been a long, sticky run for the sweet, cloying, muddy, and wholly undrinkable haze bomb. Why anyone wanted that style in the first place is beyond me. But brewers delivered—oh, they delivered. Gazillions of gallons of gooey, juicy sludge. My personal conspiracy theory? Some enterprising brewing collective took a failed batch, realized it looked like a yeast smoothie, and spun it into gold. They reproduced the mistake, marketed it as the next big thing, and convinced a shit-ton of other brewers to jump on board. Honestly? Genius.

But I digress. The real reason for this post is to share a recipe that hits the holy trinity of what makes a great India Pale Lager: clean, clear, and unapologetically hoppy. Let’s get into it.


One of my favorites

My IPL recipe:
I brewed an 11 gal. post boil batch anticipating 2 full 5 gallon kegs after fermentation. I referenced Bru'n water pale ale water profile and used 75% reverse osmosis water.

Efficiency 88%,  Attenuation 87%,  ABV 7.35%, SRM 5.5, IBU 66, OG 1.064, FG 1.008

20 lbs. Pilsner malt (Weyermann)
  1 lbs. Crystal #20 
  1 lbs. Dextrin malt
  2 kilos refined sugar at start of boil

Mash in at 152f. in 6 gal. h2o for 60 minutes.
Sparge for 45 minutes with 170f. h2o 
Boil 60 minutes with:
FWH : 60 gram Mosaic 13.6 a/a % for 21 ibu's
60 min. add: 100 gram Chinook from previous dry hopped batch est. 31 ibu's
20 min. add: 30 gram Chinook 11.4 a/a% for 11 ibu's
 5 min. add: 30 gram Columbus 14.7 a/a% for 3 ibu's 
20 min. Cool Pool addition at 160f. with 120 gram Columbus and 120 gram Idaho 7

Chilled down to 50f., transfer to fermenter and pitched salvaged 34/70 lager yeast. After 3 days raised temperature to 53f., after 3 more days raised temp. to 57f., after 3 more days raised temp. to 62f. for 1 day.
Then, lowered temp. to 55f. and dry hopped for 12 hours with 60 grams each of Columbus and Idaho 7, then another addition of dry hops for 12 more hours with 60 grams each of Columbus and Idaho 7.

Transfer to kegs and lagered 1 month in refer at 40f.

On tap now at my house if you want to come by for a pint. Cheers!


Related Posts Plugin for WordPress, Blogger...

About Beer Diary...