Showing posts with label lagers. Show all posts

Friday, April 25, 2025

Glycol Chiller Part II

open fermenter also know as a garbage can
In Part 1, we took a dive into how I engineered a DIY glycol chiller—a way to keep my fermenters cool without emptying my wallet. From repurposing an air conditioner to using a temperature controller and a humble light bulb to trick the system, the build is all about thinking outside the box and making sure my beer stays in that perfect fermentation temperature zone. But keeping the glycol chilled is only half the battle. Here in Part 2, let me show you how I circulate that cold glycol to maintain the ideal fermentation temperatures and make sure everything stays on track during the hot months. Let's get that cold fluid where it really counts.


Now that we’ve got a reliable reservoir of sub-zero glycol humming along in our Igloo cooler, it’s time to move that cold power where it counts: the fermenters. At the center of this operation is what I like to call the Command Module
—a black utility box fitted with three ST-1000 temperature controllers and corresponding electrical outlets. Each controller is assigned to a fermenter, with its own dedicated temperature probe immersed in the beer. Actually, the probe is not immersed, it's duct taped to the inside of the garbage can and then a food grade liner (bag) is placed into the garbage can so that the fermenting beer doesn't touch the plastic. But the sensor is in indirect contact with the beer through the plastic liner. Power flows in from a 110v line at the base, while the three sensor cables feed in from the fermenters, giving the controllers real-time temperature data.

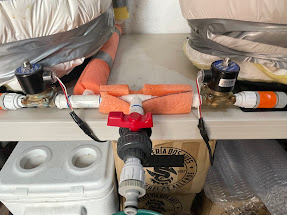
Each outlet is split into two zones: the top socket handles cooling, and the bottom socket handles heating. When a controller senses the beer creeping above the set temp, it energizes the top outlet—simultaneously activating a pump and opening a solenoid valve. That’s the magic moment: glycol is unleashed, rushing through a garden hose coiled around a garbage can fermenter, drawing out the excess heat and returning to the glycol reservoir. If the beer drops below target? The bottom socket kicks on a heating pad tucked beneath the can, gently nudging the temperature back up.

It’s a tightly orchestrated dance of sensors, solenoids, and controlled chaos—all in the name of perfect fermentation.


Fermenter with water heater insulation

So yes—at first glance, and second for that matter, the whole setup might look like something cobbled together in a backwoods lawmower shed. It’s not shiny, it’s not stainless, and it sure won’t be winning any design awards. But what it is—is effective. This system controls fermentation temperatures with surprising precision, all at a fraction of the cost of the sleek, space-age hardware you’ll currently find in your online homebrew outlet. Case in point? I was able to crash cool my last India Pale Lager down to 40°F overnight—no sweat, no drama. Just clever engineering on a budget.

Cheers!


Tuesday, April 8, 2025

Time to brew some lagers

With my homebrew glycol system now up and running (more on that soon), it felt like the perfect time to dive into the world of lagers. I tend to gravitate toward classic styles, so my latest brew is a nod to the standard American lager—clean, crisp, and easy-drinking. Below you'll find the recipe for what I'm calling Markweiser, a rice lager featuring 22% pre-cooked white rice in the grain bill. It’s light, refreshing, and made to be shared.


Markweiser

I brewed an 11 gal. post boil batch anticipating 2 full 5 gallon kegs after fermentation. I referenced Bru'n water yellow balanced profile and used 75% reverse osmosis water.

Effeciency 92%, Attenuation 87%, ABV 5.5% (on the high side for style), SRM 3, IBU 17, O.G. 1.048, F.G. 1.006

14 lbs. Pilsner malt

8 ounces of dextrin malt

4 lbs. cooked rice

Mashed in at 150f. for 90 minutes to fully convert the rice starch and boiled 90 minutes with 30 gram warrior hops for bitterness and a coolpool addition at 170f. for 20 minutes with 30 grams Hallertau for aroma. Then into the fermenter with salvaged 34/70 yeast from a previous batch of Munich helles.

The beer turned out pretty good. Could it be better? Of course. One change I would make would be to get my mash ph down from 5.5 to 5.2 as the higher mash ph may have contributed to a very subtle astringency. If you have any questions about this recipe or of my processes, leave them in the comment section below.

Cheers!

Related Posts Plugin for WordPress, Blogger...

About Beer Diary...