Friday, April 25, 2025

Glycol Chiller Part II

open fermenter also know as a garbage can
In Part 1, we took a dive into how I engineered a DIY glycol chiller—a way to keep my fermenters cool without emptying my wallet. From repurposing an air conditioner to using a temperature controller and a humble light bulb to trick the system, the build is all about thinking outside the box and making sure my beer stays in that perfect fermentation temperature zone. But keeping the glycol chilled is only half the battle. Here in Part 2, let me show you how I circulate that cold glycol to maintain the ideal fermentation temperatures and make sure everything stays on track during the hot months. Let's get that cold fluid where it really counts.


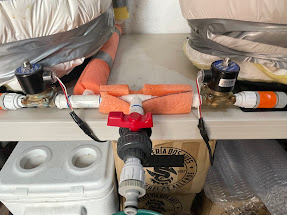
Now that we’ve got a reliable reservoir of sub-zero glycol humming along in our Igloo cooler, it’s time to move that cold power where it counts: the fermenters. At the center of this operation is what I like to call the Command Module
—a black utility box fitted with three ST-1000 temperature controllers and corresponding electrical outlets. Each controller is assigned to a fermenter, with its own dedicated temperature probe immersed in the beer. Actually, the probe is not immersed, it's duct taped to the inside of the garbage can and then a food grade liner (bag) is placed into the garbage can so that the fermenting beer doesn't touch the plastic. But the sensor is in indirect contact with the beer through the plastic liner. Power flows in from a 110v line at the base, while the three sensor cables feed in from the fermenters, giving the controllers real-time temperature data.

Each outlet is split into two zones: the top socket handles cooling, and the bottom socket handles heating. When a controller senses the beer creeping above the set temp, it energizes the top outlet—simultaneously activating a pump and opening a solenoid valve. That’s the magic moment: glycol is unleashed, rushing through a garden hose coiled around a garbage can fermenter, drawing out the excess heat and returning to the glycol reservoir. If the beer drops below target? The bottom socket kicks on a heating pad tucked beneath the can, gently nudging the temperature back up.

It’s a tightly orchestrated dance of sensors, solenoids, and controlled chaos—all in the name of perfect fermentation.


Fermenter with water heater insulation

So yes—at first glance, and second for that matter, the whole setup might look like something cobbled together in a backwoods lawmower shed. It’s not shiny, it’s not stainless, and it sure won’t be winning any design awards. But what it is—is effective. This system controls fermentation temperatures with surprising precision, all at a fraction of the cost of the sleek, space-age hardware you’ll currently find in your online homebrew outlet. Case in point? I was able to crash cool my last India Pale Lager down to 40°F overnight—no sweat, no drama. Just clever engineering on a budget.

Cheers!


Friday, April 18, 2025

DIY Glycol Chiller: Because it's fun

When it comes to homebrewing on a budget, the name of the game is resourcefulness. We’re talking Goodwill ingenuity, garage-engineered brilliance, and yes—even cardboard boxes and plumbing scraps if the job calls for it. Because at the end of the day, if it works, it works. And if it works well? Even better.

Take, for instance, my homemade glycol chiller—a critical piece of equipment for keeping fermentations cool during the toasty months here in Michoacán. You could drop some serious cash on a commercial unit from a reputable supplier like MoreBeer! or Northern Brewer, and you’d be perfectly justified in doing so. But if you're like me—stretching every dollar like sourdough starter—you start looking at what's lying around and think, there's got to be a better way. Spoiler: there is.

The Concept

The goal is simple: maintain a reservoir of chilled glycol to circulate around fermentation vessels, keeping them at a consistent temperature even when ambient conditions say otherwise.

The method? A little creative subversion of modern appliances, a reliable temperature controller, and some good old-fashioned DIY elbow grease. 

The Build

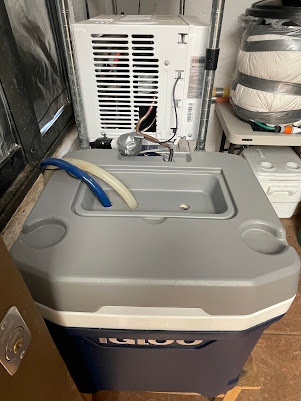
Let’s start with the core of the system: a 5,000 BTU Mirage window air conditioner. I carefully disassembled it (read: didn’t just rip it open with a crowbar), isolating the cooling coil assembly, which was then submerged in a 60-quart Igloo cooler filled with a glycol-water mixture. This transforms your everyday beverage cooler into a cold bath powerhouse. To be clear, after removing the unit housing I needed to slowly and carefully bend the copper tubing.

Now, here’s where the clever bit happens. A standard Inkbird temperature controller monitors the glycol temperature via a submerged probe. When that glycol creeps above 32°F, the Inkbird sends power to—wait for it—a low-wattage light bulb. That bulb is positioned directly against the air conditioner's internal temperature sensor.


Wait… a light bulb?

Yes, because here's the trick: the air conditioner only turns on if it thinks the room is hot enough. The front panel is set to 80°F, a temperature the room never actually reaches. But when the light bulb warms the sensor, the air conditioner believes it’s sweltering, kicks on the compressor, and starts chilling.

When the glycol drops to the target 28°F (with a 4°F differential), the Inkbird shuts off the light bulb. The sensor cools, the A/C thinks the room has returned to its happy place, and the compressor shuts off. Elegant? Maybe not. Effective? Absolutely.

The Cycle

To recap:

  • Glycol > 32°F? → Inkbird powers light bulb → Sensor heats → A/C compressor turns on

  • Glycol ≤ 28°F? → Inkbird shuts bulb off → Sensor cools → A/C shuts down

Depending on ambient temperature, the system cycles every 4–6 hours—keeping the glycol right in that chilly sweet spot.

Why It Works

This build is a great reminder that temperature regulation isn’t just about cold air—it’s about control. You’re not freezing beer here; you’re managing a tight fermentation window, where degrees matter. And building your own glycol chiller isn’t just a workaround. It’s a better understanding of how cooling systems work, and how you can manipulate them with a few smart tricks.

In Part 2, I’ll walk you through how I circulate the glycol through my fermentation system—because cold fluid in a cooler isn’t doing much unless you can deliver it where it counts.

Until then: stay cool, brew smart, and remember—hardware stores are the toy stores of adulthood.


Sunday, April 13, 2025

Homebrew In Decline


When I started homebrewing in the late ’90s, it wasn’t because I wanted to ride some trendy wave—it was because I was broke and thirsty. Sierra Nevada Pale Ale was my holy grail, but back then, buying a six-pack felt like choosing between good beer and groceries. So I figured, hell, I’ll just make it myself. How hard could it be?

Pretty damn hard, it turns out.

I dove in headfirst, drunk on the belief that I could crack their code on my first or second try. Spoiler alert: I couldn’t. Batch after batch of well-intentioned swill taught me a humbling truth—good beer isn't easy. It takes patience. Precision. Pain. But through all the misfires and off flavors, I kept going. Somewhere along the way, I stopped chasing Sierra Nevada and started making something that was mine. It wasn’t their beer anymore. It was my beer. And it was good.

Back then, homebrewing felt like a secret society—a ragtag crew of misfits and dreamers stirring kettles in garages, swapping yeast strains like old vinyl. It was small, scrappy, and electric.

By 2013, the American Homebrewers Association claimed 1.2 million of us were out there, bubbling away in basements and backyards. But a few years later, those numbers slipped. Today? I don’t need data to tell me it’s fading. I can feel it. The forums are quieter. The homebrew shops thinner. The energy’s changed.

Some say the rise of craft beer killed the hobby—why brew when you can just buy something amazing off the shelf? Maybe they’re right. But that was never why I did it. It wasn’t just about the beer. It was the process. The alchemy. The long boil on a cold day, the hiss of fermentation, the camaraderie of the club. We weren’t just brewing—we were building something. A ritual. A rebellion. A way to say, "This one’s mine."

And yeah, I was cheap too. Ten gallons of my house pale ale cost me about twenty-five cents a pint—ingredients, gas, CO2, the works. But that wasn’t the point. Not really.

Now? It feels like something’s gone missing. Like the soul of homebrewing has slipped out the back door without saying goodbye. And just to rub salt in the wound, the craft beer industry—the one we helped ignite—is shrinking, too. Taprooms closing. Tanks drying. The revolution’s slowing down.

Maybe it’s just me. Maybe I’m getting old, stuck in some sudsy nostalgia loop. But I miss it. I miss what it meant. What it gave us. That fire. That freedom.

Sorry. Give me a moment.

Tuesday, April 8, 2025

Time to brew some lagers

With my homebrew glycol system now up and running (more on that soon), it felt like the perfect time to dive into the world of lagers. I tend to gravitate toward classic styles, so my latest brew is a nod to the standard American lager—clean, crisp, and easy-drinking. Below you'll find the recipe for what I'm calling Markweiser, a rice lager featuring 22% pre-cooked white rice in the grain bill. It’s light, refreshing, and made to be shared.


Markweiser

I brewed an 11 gal. post boil batch anticipating 2 full 5 gallon kegs after fermentation. I referenced Bru'n water yellow balanced profile and used 75% reverse osmosis water.

Effeciency 92%, Attenuation 87%, ABV 5.5% (on the high side for style), SRM 3, IBU 17, O.G. 1.048, F.G. 1.006

14 lbs. Pilsner malt

8 ounces of dextrin malt

4 lbs. cooked rice

Mashed in at 150f. for 90 minutes to fully convert the rice starch and boiled 90 minutes with 30 gram warrior hops for bitterness and a coolpool addition at 170f. for 20 minutes with 30 grams Hallertau for aroma. Then into the fermenter with salvaged 34/70 yeast from a previous batch of Munich helles.

The beer turned out pretty good. Could it be better? Of course. One change I would make would be to get my mash ph down from 5.5 to 5.2 as the higher mash ph may have contributed to a very subtle astringency. If you have any questions about this recipe or of my processes, leave them in the comment section below.

Cheers!

Related Posts Plugin for WordPress, Blogger...

About Beer Diary...