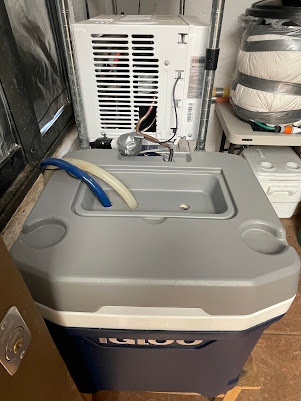
When it comes to homebrewing on a budget, the name of the game is resourcefulness. We’re talking Goodwill ingenuity, garage-engineered brilliance, and yes—even cardboard boxes and plumbing scraps if the job calls for it. Because at the end of the day, if it works, it works. And if it works well? Even better.
The Concept
The goal is simple: maintain a reservoir of chilled glycol to circulate around fermentation vessels, keeping them at a consistent temperature even when ambient conditions say otherwise.
The method? A little creative subversion of modern appliances, a reliable temperature controller, and some good old-fashioned DIY elbow grease.
The Build
Now, here’s where the clever bit happens. A standard Inkbird temperature controller monitors the glycol temperature via a submerged probe. When that glycol creeps above 32°F, the Inkbird sends power to—wait for it—a low-wattage light bulb. That bulb is positioned directly against the air conditioner's internal temperature sensor.
Wait… a light bulb?
Yes, because here's the trick: the air conditioner only turns on if it thinks the room is hot enough. The front panel is set to 80°F, a temperature the room never actually reaches. But when the light bulb warms the sensor, the air conditioner believes it’s sweltering, kicks on the compressor, and starts chilling.
When the glycol drops to the target 28°F (with a 4°F differential), the Inkbird shuts off the light bulb. The sensor cools, the A/C thinks the room has returned to its happy place, and the compressor shuts off. Elegant? Maybe not. Effective? Absolutely.
The Cycle
To recap:
-
Glycol > 32°F? → Inkbird powers light bulb → Sensor heats → A/C compressor turns on
-
Glycol ≤ 28°F? → Inkbird shuts bulb off → Sensor cools → A/C shuts down
Depending on ambient temperature, the system cycles every 4–6 hours—keeping the glycol right in that chilly sweet spot.
Why It Works
This build is a great reminder that temperature regulation isn’t just about cold air—it’s about control. You’re not freezing beer here; you’re managing a tight fermentation window, where degrees matter. And building your own glycol chiller isn’t just a workaround. It’s a better understanding of how cooling systems work, and how you can manipulate them with a few smart tricks.
In Part 2, I’ll walk you through how I circulate the glycol through my fermentation system—because cold fluid in a cooler isn’t doing much unless you can deliver it where it counts.
Until then: stay cool, brew smart, and remember—hardware stores are the toy stores of adulthood.


1 comment:
test
Post a Comment